E4S
Analog Outputs
Material for a UC Irvine course offered by the Department of Physics Astronomy and developed by David Kirkby.
In this activity you will learn about the pulse-width modulation (PWM) technique for outputting a pseudo-analog voltage from your microcontroller.
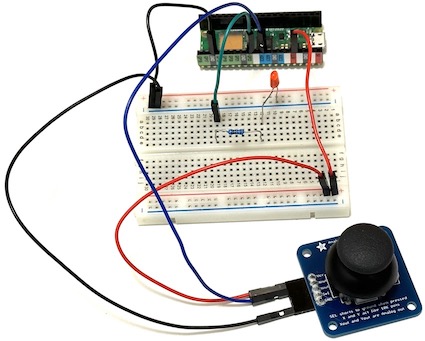
Build the circuit below using a Pico W microcontroller (not yet connected to your laptop via USB), a 1KΩ resistor, a red or green LED (your choice), the joystick, your breadboard and some jumper wires:

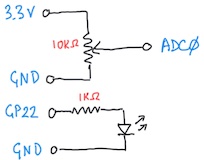
The corresponding circuit diagram is:

Note that this really two separate circuits connected to the microcontroller: one that reads the Xout analog state of the joystick via ADC0, and the other that drives an LED via GP22. However, we can use a program to connect these circuits in different ways, for example:
import time
import board
import analogio
import digitalio

Xout = analogio.AnalogIn(board.A0)
LED = digitalio.DigitalInOut(board.GP22)
LED.direction = digitalio.Direction.OUTPUT

while True:
    value = Xout.value
    print('Xout =',hex(value))
    if value < 0x4000 or value > 0xa000:
        LED.value = True
    else:
        LED.value = False
    time.sleep(0.2)
What do you expect this program to do? Try it.
The code above connects the joystick analog input to a digital output. Now we will connect it instead to a pseudo-analog output using a technique called pulse-width modulation (PWM):
import time
import board
import analogio
#import digitalio
import pwmio

Xout = analogio.AnalogIn(board.A0)
#LED = digitalio.DigitalInOut(board.GP22)
#LED.direction = digitalio.Direction.OUTPUT
PWM = pwmio.PWMOut(board.GP22, frequency=8)

while True:
    value = Xout.value
    print('Xout =',hex(value))
    #if value < 0x4000 or value > 0xa000:
    #    LED.value = True
    #else:
    #    LED.value = False
    PWM.duty_cycle = value
    time.sleep(0.2)
This code keeps the original digital output in comments so you can compare with the new analog output. What happens now when you move the joystick?
Any GPn pin on the Pico W can be used for PWM output like this. The necessary initialization is:
PWM = pwmio.PWMOut(board.GP22, frequency=8)
to specify which pin you are using and a base frequency in Hertz. Normally we will use much higher frequencies, but we start with the lowest allowed frequency of 8 Hertz so we can see the analog variation in the LED flashing, which is controlled by:
PWM.duty_cycle = value
A duty cycle is normally in the range 0-1 (or 0-100%) but we generally avoid floating-point values in microcontroller code so instead values are specified in the range 0x0000-0xffff, i.e. with an unsigned 16-bit integer. Conveniently, the ADC Xout.value uses the same range, which simplifies our code.
Change the PWM frequency to 10Hz and 100Hz and describe what happens.
For a deeper dive into pulse-width modulation, visit this interactive visualization to answer these questions:
- Why do we call this a “pseudo” analog output technique?
- What hex value of the duty cycle gives an (average) output of Vcc/10?
- Try different values of R and C for filtering the PWM output. What is the general rule for smoother output?
- For fixed R and C values, does the smoothness of the output depend on the PWM frequency? If so, how?
- For fixed R and C values, does the smoothness of the output depend on the duty cycle? If so, how?
- For fixed R and C values, does the smoothness of the output depend on the supply voltage Vcc? If so, how?
PWM is often used to drive a servo motors: see here for details.
Now that you have seen an example of analog output, you are ready for a closer look at how analog input works, since it internally relies on analog output. Visit this interactive visualization to answer these questions:
- What is the 8-bit ADC value corresponding to Vcc = 1V and Vin = 0.2V?
- What is the 8-bit ADC value corresponding to Vcc = 5V and Vin = 1.0V?
- What input voltage causes the DAC voltage to increase at each step? What is the corresponding ADC value?
- What input voltage causes the DAC voltage to decrease at each step? What is the corresponding ADC value?
- What range of input voltages correspond to an 8-bit binary ADC value of 10101010 with Vcc = 1V?