E4S
Initial Microcontroller Setup
Material for a UC Irvine course offered by the Department of Physics Astronomy and developed by David Kirkby.
Each kit includes two Raspberry Pi Pico-W microcontroller boards. You will use these to bring your circuits to life with some python programs that you write. A microcontroller is a simple device that runs a single relatively simple program. It is not what you normally think of as a “computer”, with an operating system or file system, unlike its bigger sister the Raspberry Pi 4.
Each microcontroller contains two “firmware” programs: a bootloader (similar to a computer’s BIOS program) and a main program (similar to computer’s operating system kernel). The traditional way of working with a microcontroller is to install a new main program (often written in C) every time you make a change to your code, using the bootloader. However, these devices are now capable enough to run a python interpreter, which enables simpler programming and allows you to focus more on design and less on low-level details. Therefore, the steps below install CircuitPython as the main program.
The final piece of software you will need is an editor that works well with the CircuitPython development environment. Unlike the bootloader and main program, which run on the microcontroller, the editor runs on your computer and communicates with the microcontroller over USB.
The steps described below ensure that you have current working versions of these programs, and are based on the general instructions here. These instructions were last updated in Jan 2025. For archived past instructions see Jan 2025, Jan 2024, Jan 2023, Jan 2022 or Jan 2021.
Install CircuitPython on each Pico W
Download this circuit python program to your laptop. Since this program will run on the microcontroller, not your laptop, it does not matter what operating system your laptop is running.
Connect the Pico W to your laptop with a USB cable and look for a new USB drive in your operating system. If no USB drive appears, let the instructor know (or try the expert last resort steps yourself), and try using your other Pico W.
Mac users: if you get a popup asking “Allow accessory to connect?”, click “Connect”.
Reset your USB drive if it is not called RPI-RP2
If your USB drive is called RPI-RP2, skip to the section below. Otherwise, it is mostly likely called CIRCUITPY and this just means someone else has already installed an older version of the software you will need for this course. To reset your Pico W and continue with the instructions below, follow these steps:
- Open the drive and delete all of the files it contains (i.e. drag them to the Trash).
- Eject the CIRCUITPY drive and uplug the USB cable from your laptop.
- Press and hold down the small white button while you plug the USB back into your laptop. (Mac users may need to allow the accessory to connect again).
- You should now see the drive called RPI-RP2 and can release the white button and proceed with the steps below.
Install software on USB drive called RPI-RP2
Copy the downloaded file to the USB drive, e.g. using drag and drop. After a short while (10-20 secs) the RPI-RP2 drive should be replaced with one called CIRCUITPY. This indicates that you have successfully installed the CircuitPython program on your microcontroller.
Mac users will probably get a warning about “Disk Not Ejected Properly” that you can safely ignore.
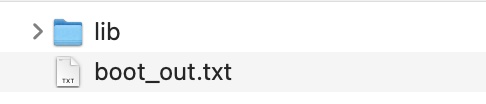
If you open your CIRCUITPY drive, you should see only a single small text file boot_out.txt that starts with the lines (the extra two lines are unique to your Pico):
Adafruit CircuitPython 10.0.3 on 2025-10-17; Raspberry Pi Pico W with rp2040
Board ID:raspberry_pi_pico_w
If you see other files, and you forgot to delete them in the instructions above, delete them now and repeat this section. Otherwise, let the instructor know.
Eject your CIRCUITPY drive the same way you would remove any USB drive, then repeat these steps for the other Pico W in your kit.
Since both of your microcontrollers now have the same USB drive name, it would be confusing to have them both connected to your laptop at the same time. However, while we will sometimes use both at once in a project, we will not need them both connected via USB at once.
Libraries
Some of the components in the kit need additional libraries that are not installed when you install CircuitPython. Any extra libraries needed are always mentioned in the comments at the top of each component’s hello example.
To install an additional library, you just copy it into a lib folder of your CIRCUITPY USB drive. You only need to do this once. The instructions below show you how to install all of the libraries for the kit components at once.
Since we are running CircuitPython 10.0.3, we need to install libraries from the 10.x bundle (we are using 10.x from the 20251231 auto release). We do not install the whole bundle since it is too big to fit in the microcontroller memory.
Download and expand this zip file with the libraries needed by the following kit components:
- OLED display
- pressure & altitude sensor
- acceleration & rotation & magnetic field sensor
- 10-band photodetector
- ultrasonic distance sensor
- Pico-W wifi networking
If you are curious, this python script was used to create this zip file from the whole bundle.
The expanded folder should be called lib. Open your CIRCUITPY USB drive and copy the lib folder (e.g. using drag and drop) to your CIRCUITPY USB drive.
In case you do this later on, note that copying to CIRCUITPY will always restart any program that is already running on the board.
Your CIRCUITPY drive should now have the following contents:
and the lib folder should contain:
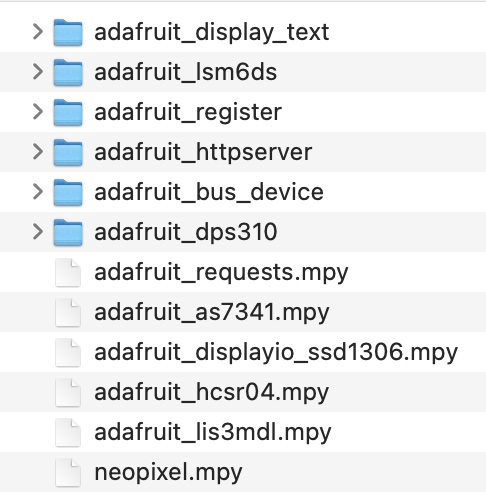
You are now ready to use these libraries.
Install the Thonny Editor
You have completed the setup of your microcontroller boards and are now ready to install a code editor on your laptop.
Any file named code.py on your CIRCUITPY drive will be automatically run whenever your microcontroller is reset, either when you initially connect it via USB or when you press its reset button.
There is no file called
code.pyon your CIRCUITPY drive after the initial setup, but you will create it below.
In principle, you can use any text or code editor to modify code.py directly from the USB drive. However,
we will start with a program called Thonny which is specifically designed to work well with CircuitPython.
Download and install the appropriate version for your laptop from the Thonny home page.
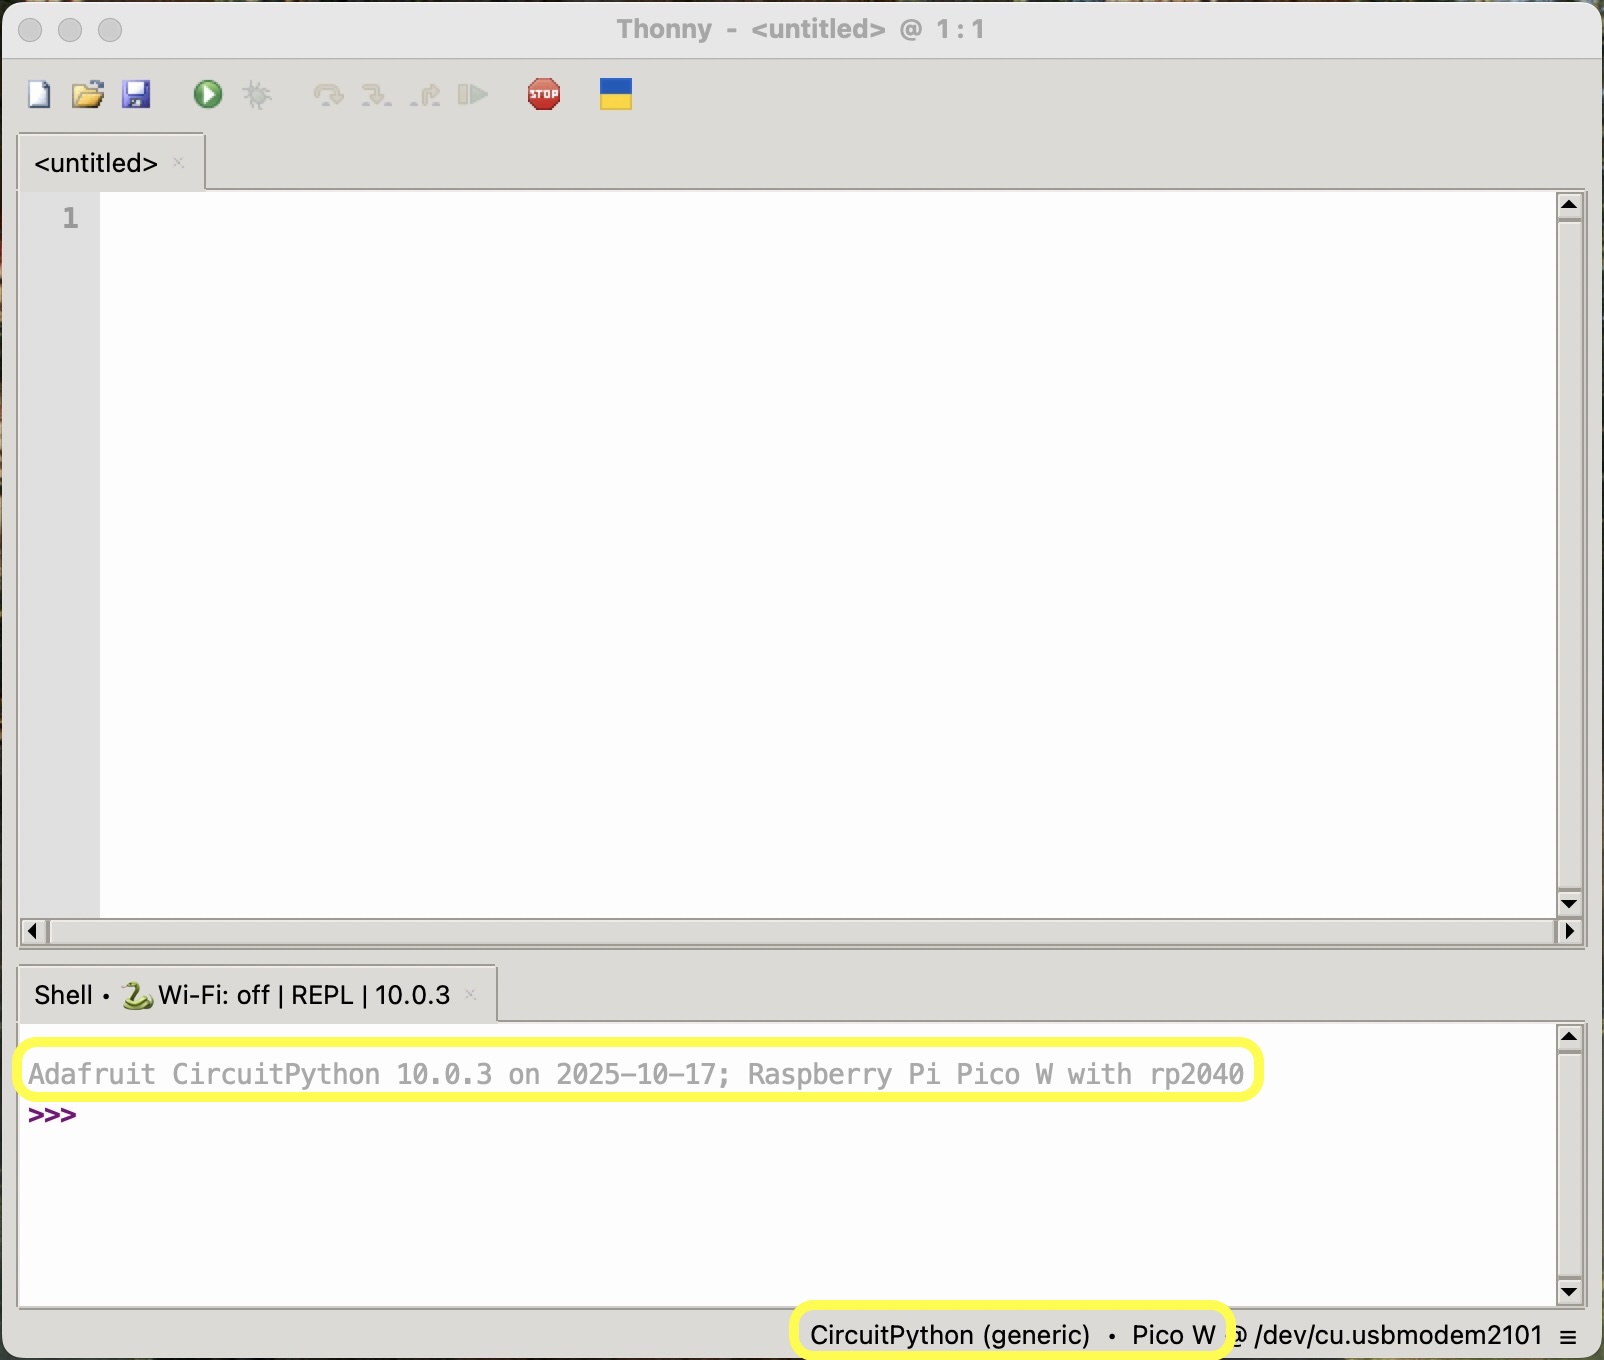
The first time you run Thonny, you will be asked to chose initial settings: select “Standard”. Next, with your Pico connected to your laptop (as “CIRCUITPY”), go to Run > Configure interpreter…, change “Local Python 3” to “Circuit Python (Generic)”, then click “OK”. Your window should now look like this, with the highlighted text confirming that you have configured Thonny to edit code on your connected Pico:
The name of the file you are currrently editing appears in the editor title bar, and should generally be code.py. The first time you use the Mu Editor with a new CIRCUITPY drive installed, the name will be untitled so use File > Save (or click the disk icon in the toolbar) now. When asked “Where to save to?” select “CircuitPython device”, then enter “code.py” as the file name and click “OK”.
Mac users might be asked for permission to access files on a removable volume: you must “Allow” this to proceed.
Verify that “
The lower “Shell” window in Thonny provides a way to directly interact with the CircuitPython interpreter running on your Pico. Ignore it for now, but it will be useful later on.
A problem you may encounter later is that you are editing a file that is not called
code.py, so your edits are having no effect on the program your Pico is running. The solution is simply to re-save your file ascode.py.
I recommend that everyone start with Thonny. However, if you prefer to use a different editor, start here. Experienced programmers often prefer to use Visual Studio Code, but be aware that it is lacking a plotting capability that we will be using in this course.
You are now ready to start programming your microcontroller boards.
This course used a similar editor called “Mu” before 2026, but it is no longer supported. However, you might still see some references to that in the course material.